Leveraging technology to change the way the world learns


The world today is changing fast with rapid technology advancements.

Education has also not remained untouched by the technology revolution. Many disruptions have ignited the education sector in nooks and corners. The impact has been slow and steady and we still have a long way to go.

Much of the world still goes through rote learning using standard and conventional approach. Several technology initiatives need to be unleashed and leveraged to change the way the world learns.

As a roadmap, one can diversify the technology use to a) operational advancement like effective usage of existing technology to transition from manual to automated systems and b) strategic investments in research and development for innovations.

Step 1- Transition from manual to online and automated systems

To begin with, make widespread use of e-learning (highly interactive, web/mobile based courses) not only in corporates but everywhere including academic institutions.

Technology needs to be used extensively in all facets of learning like development of study material, curriculum, imparting lectures, recording and online distribution of material and content, evaluation and feedback.

The concept of virtual classrooms needs to be adapted more often to overcome the obstacles of distance, time and economics.At all levels, emphasize on online research that has access to more resources.

Simpler yet effective disruptions also cut across various socio-barriers like Touch screen kiosks in rural areas and free, online video tuitions by Khan Academy.

Additionally, technology has made collaboration seamless and effortless.

All the data (curriculum, study material, research content etc.) can be efficiently shared amongst peers, students, parents, teachers and any other stakeholders.

We urgently need to invest in IT infrastructure to store all data online. Storing data as hard copy, manual or offline is a big NO in today’s scenario when cost-to-benefit for hardware expenses is beyond comparison.

Besides the regular and expected benefits of having online data, one also comes across other threats and opportunities. The data needs to be kept secured if it’s confidential or private. At the same time, one also has the opportunities to collate, research, analyze, predict and take decisions by mining and harnessing this big data.

Investing in big data technology progresses us to the very pragmatic and ideal approach of custom learning as opposed to the standard approach of one size fits all. Based on big data analysis of observations and existing learning patterns of learners, future learning could be customized giving a whole new paradigm to how the world learns.

STEP 2 – Technology innovations would seem to be natural progression once online and automated system is in place.

For instance, next generation learning could benefit from wearable user-friendly voice recorders that can be used by teachers/parents to record the daily observations. This voice data then could be converted to textual data to be fed into Big data systems like Hadoop for further processing and refinement.

Another research could focus on a unified tracking mechanism of a student’s progress reviews, academic, extra-curricular, attitudinal records based on a single id like say aadhar#(SSN#) throughout the education years and in early career years.

This data could help academia in social sciences research thereby influencing learning practices.

Yet another usage of technology could be to make use of advance image processing systems to study handwriting patterns in different situations like that of stress, relaxed, happy or otherwise for psychoanalyses purpose and could give meaningful insights, thereby help drafting one’s learning program.
There is immense potential in technology to be the game changer for world’s learning eco-system. This is just the beginning.

JPEG file size reduction on OS X (Mac)

Regular JPEG files are already compressed so file compression does not yield substantial space optimization.

Next step would be to compromise on the image size and/or quality for archiving or other purposes.

On Windows, one could manually open JPEGs (if less in number) in MS Paint and save as followed by close to arrive at a much smaller file size with minuscule quality difference. If the files are large in number, then a batch file could be written giving image folder location as input which iteratively opens each image in MS Paint and saves it before closing.

There are a number of available utilities to do the same like jpeg-optimizer, jpegmini-lite etc.

However, OS X also comes with Preview app which can come to our rescue in such cases.
Here is how –

  1. Open images in Preview app which is usually the default app. If not, one can choose to view it in Preview app.
  2. Once the Preview app opens, select all images
  3. Click on File > Export selected
  4. A popup would open with options to Export. Our savior option here is the Quality slide bar. Pull the slide bar to the file size value that one desires. Once other options are also in place, click Save and the JPEG would be reduced to the chosen file size.
    Screen Shot 2015-11-13 at 1.14.18 PM

References:
https://www.quora.com/How-do-you-reduce-the-size-of-a-JPEG-file-on-MAC

NodeJS app deployment on Heroku

  1. Download Heroku client on your local machine from https://devcenter.heroku.com/articles/getting-started-with-nodejs
  2. One time Login to Heroku using your registration credentials – > heroku login
  3. Git management –
    My app to be deployed on Heroku was already up on Github.
    So I was already through with ‘git init’ n other initialization stuff.
    Get back to master branch if applicable.Now, Heroku has its own git repo server which is different from the Github that we are used to.
  4. As a result we need to add another remote for heroku to our local git like so –
    git remote add heroku
  5. Ensure your newly added heroku remote is added by listing all remotes – git remote -v
  6. Optional – Make Heroku remote as origin or else dont forget to mention heroku as remote in on your git commands. To make heroku remote as your origin –
    git remote set-url origin https://git.heroku.com/your-heroku-app-name.git. Confirm this has been correctly set – git config remote.origin.url
  7. Now execute usual git commands like so –
    – git add .
    – git commit -m ‘message for commit’
    – git push heroku master
  8. The last command to git push would not only push the code to heroku but also attempt to start the app.
  9. You can check the heroku logs if the site is not up and running as desired.
    > heroku logs
  10. Specifically for NodeJS apps, it looks for ProcFile or start command in package.json. I added the following in my package.json –
    “scripts”: {
    “start”: “node app.js”
    },
  11. Incase you want to deploy your app locally as it is deployed remotely on heroku, you can use –
    > heroku local web
    This mandates Procfile to be there in the directory.
    $ cat Procfile
    web: npm start

References:

Configuring (and sharing as hotspot WiFi) ZTE Wireless network on OS X

I have Tata Photon ZTE Wireless dongle which is to be configured on Mac OS X 10.10 aka Yosemite.

Network configuration –

  1. Download the driver which in my case was Tata-photon-CrossPlatformUI-V2.0.6-Mac.dmg.
  2. Install
  3. Open System Preferences. Click on Network icon.
  4. On the left panel, you will find few ZTE options. Choose the wireless one.
  5. Now the configuration.

Screen Shot 2015-08-20 at 12.12.55 PM

Keep both the account name and password as internet. Click on connect and you are done!!!

Sharing as Wifi HotSpot 

  1. Open System Preferences.
  2. Click on Sharing icon
  3. Right Panel – Share your connection from: ZTE Wireless Terminal
  4. To computers using: Wi-Fi
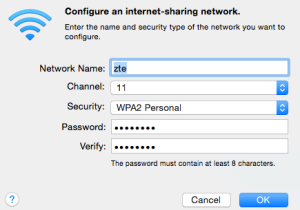
  5. Click on Wi-Fi options – Choose WPA2 Personal from Security field options. Provide appropriate credentials to be used by other devices to connect to your network sharing
  6. Screen Shot 2015-08-20 at 12.23.08 PM
  7. Select the option Internet Sharing from left panel

Screen Shot 2015-08-20 at 12.18.55 PM

And you are done now sharing your Mac network with other devices you trust …

References:

http://www.imore.com/how-turn-your-macs-internet-connection-wifi-hotspot-internet-sharing

Git | Addends to Git cheatsheet

The official Git cheatsheet – https://training.github.com/kit/downloads/github-git-cheat-sheet.pdf

Following are few command that are worth tracking besides these present in above cheat sheet –

  1. git remote show origin
    * remote origin
      Fetch URL: git@github.com:user_name/cs_webapp.git
      Push  URL: git@github.com:user_name/cs_webapp.git
      HEAD branch: master
      Remote branches:
        gh-pages tracked
        master   tracked
      Local ref configured for 'git push':
        master pushes to master (local out of date)
  2. git remote prune origin
    Deletes all stale tracking branches which have already been removed at origin but are still locally available in remotes/origin.
  3. git gc
    “cleanup unnecessary files and optimize the local repository”
  4. Incase of .gitignore not working – * Do commit all your files before executing following steps
    git rm -r --cached .
    git add .
    git commit -m "fixed untracked files"

Postgresql Setup on Mac Yosemite

Simple steps –

  1. Installation: brew install postgres
  2. DB Initialization:
    $ initdb /usr/local/var/postgres
    The files belonging to this database system will be owned by user "%system_user%".
  3. If you wish to use launchctl for operating postgres
    • ln -sfv /usr/local/opt/postgresql/*.plist ~/Library/LaunchAgents
      This will also ensure that postgres auto starts on boot.
    • Start the database immediately –
      launchctl load ~/Library/LaunchAgents/homebrew.mxcl.postgresql.plist
  4. Non-launchctl way to start postgresql-
    postgres -D /usr/local/var/postgres
  5. Create your application specific user using the same system user as superuser mentioned by postgres initialization command –
    sudo -u %system_user% createuser blog
  6. Grant DB creation permission to the new application user –
    alter role blog CREATEDB;
  7. Verify the newly created database through the commandline –
    psql -U %system_user% postgres
    # \l
    List of databases
    Name | Owner | Encoding | Collate | Ctype | Access privileges
    -----------------------+-----------+----------+-------------+-------------+--
    blog_development | blog | UTF8 | en_US.UTF-8 | en_US.UTF-8 |

References:

Ruby – Learning and Evolving – Include vs Extend

1. Including instance methods from Module into a class – Mixin

module M
  def meth
    puts "Method M"
  end
end

class C
  include M
end

C.new.meth
C.meth

$ ruby learning.rb
Method M
learning.rb:12:in `’: undefined method `meth’ for C:Class (NoMethodError)

2. Using Module methods as class methods via Extend

module M
  def meth
    puts "Method M"
  end
end

class C
  extend M
end

C.meth
C.new.meth

$ ruby learning.rb
Method M
learning.rb:12:in `’: undefined method `meth’ for # (NoMethodError)

3. Using Module methods as Instance methods via Extend

module M
  	def meth
  		puts "Method M"
  	end
end

class C
end

obj = C.new
obj.extend M
obj.meth

$ruby learning.rb
Method M

4. Common Ruby Idiom – Using `extend` to make use of both instance as well as class methods via module

module M
	def self.included(base)
		base.extend ClassMethods
	end

  	module ClassMethods
		def class_meth
	   		puts "Class Method M"
		end
  	end

  	def meth
  		puts "Method M"
  	end
end

class C
	include M
end

C.class_meth
C.new.meth

$ruby learning.rb
Class Method M
Method M

References:

https://rubymonk.com/learning/books/4-ruby-primer-ascent/chapters/48-advanced-modules/lessons/117-included-and-extend

Setting up Capistrano 3 for Rails application

Prerequisites-

  1. An existing Rails application.
  2. Application is uploaded on a SCM preferably Git
  3. Deployment server is SSH enabled. Incase you are trying local deployment on Mac OS X, you can refer here

Now the Capistrano 3 setup –

  1. Install Capistrano and its related sub-modules by adding to Gemfile –
    group :development, :test do
    gem 'capistrano', '~> 3.4.0'
    gem 'capistrano-rails', '~> 1.1.0'
    gem 'capistrano-bundler'
    end
    bundle install
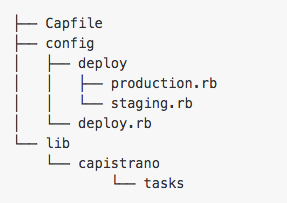
  2. Create requisite directory structure pertaining to Capistrano
    bundle exec cap install
    Screen Shot 2015-06-29 at 10.25.00 AM
  3. Update Capfile to include installed Capistrano helper modules
    # Load DSL and set up stages
    require 'capistrano/setup'
    # Include default deployment tasks
    require ‘capistrano/deploy’
    require ‘capistrano/rails’
    require ‘capistrano/bundler’
  4. Update deploy.rb with general deployment settings. Uncomment and update the configuration as applicable.
  5. Now mention deployment server and SSH connection details, say for local environment, in app > config > deploy > local.rbserver '192.168.1.xx', user: 'username', roles: %w{db web app} , :primary => true
    set :ssh_options, {
    user: 'username', # overrides user setting above
    # keys: %w(/home/user_name/.ssh/id_rsa),
    forward_agent: false,
    # auth_methods: %w(publickey password)
    password: 'Use keys'
    }
  6. Now that the bare-minimum configuration is complete, we can go ahead and test connectivity and structure creation.

    Continue reading