Tag Archives: deployment

Postgresql Setup on Mac Yosemite

Simple steps –

  1. Installation: brew install postgres
  2. DB Initialization:
    $ initdb /usr/local/var/postgres
    The files belonging to this database system will be owned by user "%system_user%".
  3. If you wish to use launchctl for operating postgres
    • ln -sfv /usr/local/opt/postgresql/*.plist ~/Library/LaunchAgents
      This will also ensure that postgres auto starts on boot.
    • Start the database immediately –
      launchctl load ~/Library/LaunchAgents/homebrew.mxcl.postgresql.plist
  4. Non-launchctl way to start postgresql-
    postgres -D /usr/local/var/postgres
  5. Create your application specific user using the same system user as superuser mentioned by postgres initialization command –
    sudo -u %system_user% createuser blog
  6. Grant DB creation permission to the new application user –
    alter role blog CREATEDB;
  7. Verify the newly created database through the commandline –
    psql -U %system_user% postgres
    # \l
    List of databases
    Name | Owner | Encoding | Collate | Ctype | Access privileges
    -----------------------+-----------+----------+-------------+-------------+--
    blog_development | blog | UTF8 | en_US.UTF-8 | en_US.UTF-8 |

References:

Setting up Capistrano 3 for Rails application

Prerequisites-

  1. An existing Rails application.
  2. Application is uploaded on a SCM preferably Git
  3. Deployment server is SSH enabled. Incase you are trying local deployment on Mac OS X, you can refer here

Now the Capistrano 3 setup –

  1. Install Capistrano and its related sub-modules by adding to Gemfile –
    group :development, :test do
    gem 'capistrano', '~> 3.4.0'
    gem 'capistrano-rails', '~> 1.1.0'
    gem 'capistrano-bundler'
    end
    bundle install
  2. Create requisite directory structure pertaining to Capistrano
    bundle exec cap install
    Screen Shot 2015-06-29 at 10.25.00 AM
  3. Update Capfile to include installed Capistrano helper modules
    # Load DSL and set up stages
    require 'capistrano/setup'
    # Include default deployment tasks
    require ‘capistrano/deploy’
    require ‘capistrano/rails’
    require ‘capistrano/bundler’
  4. Update deploy.rb with general deployment settings. Uncomment and update the configuration as applicable.
  5. Now mention deployment server and SSH connection details, say for local environment, in app > config > deploy > local.rbserver '192.168.1.xx', user: 'username', roles: %w{db web app} , :primary => true
    set :ssh_options, {
    user: 'username', # overrides user setting above
    # keys: %w(/home/user_name/.ssh/id_rsa),
    forward_agent: false,
    # auth_methods: %w(publickey password)
    password: 'Use keys'
    }
  6. Now that the bare-minimum configuration is complete, we can go ahead and test connectivity and structure creation.

    Continue reading

Brewing Apache-Passenger Journey on Yosemite

Section I: Apache Setup

1. Change DocumentRoot in the apache config file

  • vi /etc/apache2/httpd.conf
  • Replace default – DocumentRoot “/Library/WebServer/Documents”
  • with – DocumentRoot “/Users/your_user/Sites”
  • Similarly change the path with in the <Directory> block.
  • Inside the <Directory> block, replace AllowOverride None with AllowOverride All
  • Provide proper ServerName and ensure its DNS entry is updated. Can use for local development purpose –

    ServerName  localhost

2. Change default Apache user and group to yours.

  • Comment out lines – User _www  and Group _www
  • Add User your_user  and Group staff

3. Create DocumentRoot as mentioned in the config file

  • mkdir ~/Sites
  • Add your application or a simple index.html for the time being to test out apache setup

4. Test by browsing to http://localhost

Section II – Passenger Setup

1. brew install passenger

2. Per the step 1. output, create  /etc/apache2/other/passenger.conf:

  LoadModule passenger_module /usr/local/opt/passenger/libexec/buildout/apache2/mod_passenger.so

  PassengerRoot /usr/local/opt/passenger/libexec/lib/phusion_passenger/locations.ini

  PassengerDefaultRuby /usr/bin/ruby

3. If you are not using system ruby, update the PassengerDefaultRuby in step 2 accordingly.

I am using rbenv, hence –

which ruby
$/Users/user_name/.rbenv/shims/ruby

4. No need for the command –

passenger-install-apache2-module

Section III – Apache Passenger Integration

1. Update /etc/apache2/httpd.conf

    • Include Passenger.conf created in section II by adding following line at the end of httpd.conf-

      /private/etc/apache2/other/*.conf
    • UnComment the following line since we would be creating our site specific virtual host –
      Include /private/etc/apache2/extra/httpd-vhosts.conf

2. Site specific virtual host can be created by including blocks as given below –


vi /private/etc/apache2/extra/httpd-vhosts.conf
 
<Virtualhost *:80>  
   ServerName localhost  
   DocumentRoot /Users/your_user/Sites/blog/public/  
   RailsEnv development  
   LogLevel warn  
   CustomLog /var/log/apache2/blog-production-access.log "%h %l %u %t \"%r\" %>s %b \"%{Referer}i\" \"%{User-agent}i\" \"%{Host}i\" %D"  
   ErrorLog /var/log/apache2/blog-production-error.log  
   UseCanonicalName Off  
   <Directory "/Users/your_user/Sites/blog/public">  
       Allow from all  
       Options -MultiViews  
       Options FollowSymLinks  
   </Directory>  

3. Check for syntax errors and rectify any typos if any-

    • sudo apachectl configtest && sudo apachectl graceful
    • sudo passenger-config validate-install

4. If all good, start Apache.

Verify the installation by checking the apache logs and passenger stats –

sudo apachectl start
tail -f /var/log/apache2/error_log 
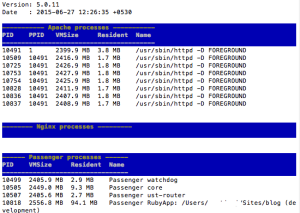
sudo passenger-memory-stats.

This would show GUI with separate sections for Apache, nginx and Passenger processes.

If the installation is successful, Apache and Passenger processes section would be non-empty and show some processes.

Screen Shot 2015-06-27 at 12.29.46 PM

References:

ROR setup on OS X

Ruby on Rails setup on MAC OS (OS X) is a cakewalk especially when have tried your hand at ROR setup on Windows before.

Ruby installation on Windows platform has improved by miles over past few years.

One click installer for Ruby is a boon for Windows users.

But the real fun starts when you try setting up Rails also with the same optimism.

Anyhow, thats another story for another day.

For now enjoy ROR in OS X world with straightforward setup instructions with no hacks. Here are the links with clear instructions which don’t need any marshelling or camouflaging –

  1. https://richonrails.com/articles/setting-up-ruby-on-rails-os-x-10-10-yosemite
  2. https://gorails.com/setup/osx/10.10-yosemite

Happy RORing 🙂

Node JS installation on CentOS

Install Node JS on CentOS –
  1. Install the additional libraries required for source code compilation –

yum -y groupinstall ‘Development Tools’
yum -y install openssl-devel* ncurses-devel* zlib*.x86_64
yum -y install bzip2 bzip2-devel bzip2-lib

2. Ensure you have Python 2.7 on your CentOS else node JS compilation fails

curl -O http://python.org/ftp/python/2.7/Python-2.7.tgz
tar xfz Python-2.7.tgz

In case of permission error,

sudo chmod -R 777 Python-2.7

cd Python-2.7

./configure

make
make install

Ensure version installed –
python -V
3. Install Node JS

cd /usr/local/src
wget http://nodejs.org/dist/v0.8.8/node-v0.8.8.tar.gz
tar zxvf node-v0.4.10.tar.gz

In case of permission error,

sudo chmod -R 777 node-v0.4.10

cd node-v0.4.10

./configure

make
make install

If make install gives permission error,

sudo make install

Again, if there are errors like these –

python tools/install.py install File “tools/install.py”, line 219

cmd = args[1] if len(args) > 1 else ‘install’ ^

SyntaxError: invalid syntax make: *** [install] Error 1

Here is the solution –

sudo python tools/install.py install

Reference Links –

  1. http://mythinkpond.wordpress.com/2011/12/28/how-to-upgrade-to-python-2-7-on-centos/
  2. http://serverfault.com/questions/299288/how-do-you-install-node-js-on-centos
  3. http://orion98mc.blogspot.in/2012/08/two-hours-ill-never-get-back.html

Nodejs app @ windows on nodester

Download git for windows here.

Download github for windows here.

Open git bash from with in git sub menu.

Git bash has *nix shell environment simulated.

Download node.js from the site. Ensure installation by –

 node -v

Generate and add public key to the github from your current device if not already installed

ssh-keygen -t rsa -C “<email>”

vi /c/Users/<user account>/.ssh/id_rsa.pub

Copy the public key. Add it as SSH key to the github here.

Install nodester client –

npm install nodester-cli -g

Setup user account at nodester –

noderster user setup <user> <password>

Configure github key for the nodester account

nodester user setkey

Create a default nodejs app via the client –

nodester app create test-app

Initialize the newly created nodejs app from the previous step –

nodester app init test-app

cd test-app/

vi server.js

Start the server and view on browser http://localhost:<port-number-as-given-in-server-js&gt;

node server.js

Browse your git remote repo list like so –

git remote -v

The nodester repo may be present by the name of origin.

Incase, you want to change the nodester repo name from origin to more specific name, go ahead –

Remove origin repo –

git remote rm origin

Fetch your git repo handle on nodester like so –

nodester app info nraj

Add this repo to your remote repo list –

git remote add nodester git@nodester.com:/node/git/test-app/<unique-key>.git

This would set the nodester repo name in the repo list as nodester instead of origin.

Now, add this code to nodester git using

git add .

git commit -m ‘first hello world’

git push nodester master

For non-nodester usage, you might still want to configure your github repo, say as origin –

git remote add origin https://github.com/neetiraj/hello-world-njs.git

Push the same app to github origin repo-

git push origin master

Don’t forget to install express npm for nodejs apps –

nodester npm install nraj express

All set to go!