Tag Archives: ROR

Brewing Apache-Passenger Journey on Yosemite

Section I: Apache Setup

1. Change DocumentRoot in the apache config file

  • vi /etc/apache2/httpd.conf
  • Replace default – DocumentRoot “/Library/WebServer/Documents”
  • with – DocumentRoot “/Users/your_user/Sites”
  • Similarly change the path with in the <Directory> block.
  • Inside the <Directory> block, replace AllowOverride None with AllowOverride All
  • Provide proper ServerName and ensure its DNS entry is updated. Can use for local development purpose –

    ServerName  localhost

2. Change default Apache user and group to yours.

  • Comment out lines – User _www  and Group _www
  • Add User your_user  and Group staff

3. Create DocumentRoot as mentioned in the config file

  • mkdir ~/Sites
  • Add your application or a simple index.html for the time being to test out apache setup

4. Test by browsing to http://localhost

Section II – Passenger Setup

1. brew install passenger

2. Per the step 1. output, create  /etc/apache2/other/passenger.conf:

  LoadModule passenger_module /usr/local/opt/passenger/libexec/buildout/apache2/mod_passenger.so

  PassengerRoot /usr/local/opt/passenger/libexec/lib/phusion_passenger/locations.ini

  PassengerDefaultRuby /usr/bin/ruby

3. If you are not using system ruby, update the PassengerDefaultRuby in step 2 accordingly.

I am using rbenv, hence –

which ruby
$/Users/user_name/.rbenv/shims/ruby

4. No need for the command –

passenger-install-apache2-module

Section III – Apache Passenger Integration

1. Update /etc/apache2/httpd.conf

    • Include Passenger.conf created in section II by adding following line at the end of httpd.conf-

      /private/etc/apache2/other/*.conf
    • UnComment the following line since we would be creating our site specific virtual host –
      Include /private/etc/apache2/extra/httpd-vhosts.conf

2. Site specific virtual host can be created by including blocks as given below –


vi /private/etc/apache2/extra/httpd-vhosts.conf
 
<Virtualhost *:80>  
   ServerName localhost  
   DocumentRoot /Users/your_user/Sites/blog/public/  
   RailsEnv development  
   LogLevel warn  
   CustomLog /var/log/apache2/blog-production-access.log "%h %l %u %t \"%r\" %>s %b \"%{Referer}i\" \"%{User-agent}i\" \"%{Host}i\" %D"  
   ErrorLog /var/log/apache2/blog-production-error.log  
   UseCanonicalName Off  
   <Directory "/Users/your_user/Sites/blog/public">  
       Allow from all  
       Options -MultiViews  
       Options FollowSymLinks  
   </Directory>  

3. Check for syntax errors and rectify any typos if any-

    • sudo apachectl configtest && sudo apachectl graceful
    • sudo passenger-config validate-install

4. If all good, start Apache.

Verify the installation by checking the apache logs and passenger stats –

sudo apachectl start
tail -f /var/log/apache2/error_log 
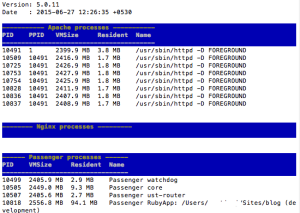
sudo passenger-memory-stats.

This would show GUI with separate sections for Apache, nginx and Passenger processes.

If the installation is successful, Apache and Passenger processes section would be non-empty and show some processes.

Screen Shot 2015-06-27 at 12.29.46 PM

References:

ROR | Rake task for Data Import

Rake task for Data Import

Export data from external source in a custom format like so –

mysql> select employee_no, username into outfile ‘/tmp/projX_users.txt’ FIELDS TERMINATED BY ‘,’ OPTIONALLY ENCLOSED BY ‘”’ LINES TERMINATED BY ‘\n’ FROM users;

Save the external data text file as a CSV in excel.

Create an import function on User model:

CSV.foreach(filename, :headers => false) do |row|

# Process each row from csv and create user object

user.create!(row.to_hash)

end

In a new rake file for custom tasks- /lib/tasks/custom_tasks.rake

namespace :import  do

desc “Import from external data sources”

task :users => :environment do

User.import_users Rails.root.to_s + ‘/db/users.csv’

end

end

Run rake task:

rake import:users —trace RAILS_ENV=production

Don’t miss passing the environment as we have declared it as dependency in our rake task definition

References:

http://stackoverflow.com/questions/363084/mysql-how-would-i-export-tables-specifying-only-certain-fields

http://stackoverflow.com/questions/4410794/ruby-on-rails-import-data-from-a-csv-file

http://stdlib.rubyonrails.org/libdoc/csv/rdoc/classes/CSV.html

ROR application instance duplication on *nix environment

Quick note of steps when duplicating a ROR application instance on *nix environment-

  1. Update db schema script to the latest in the existing instance like so –

RAILS_ENV=production rake db:schema:dump

2. mkdir <new_instance_name>

3. svn checkout <svn_path> <new_instance_name>

4. svn chown -R apache:apache <new_instance_name>

5. Change the database name in database.yml. Subsequently, create this new

db instance for the new ROR app instance –

RAILS_ENV=production rake db:create

6. Load the latest db instance into the db created in previous step –

RAILS_ENV=production rake db:schema:load

7. Create a sym link from docroot to the application’s public folder –

ln -s /path/to/my/public /path/to/my/docroot/new_app

8. Assuming you are on Passenger, register you new app instance in apache –

RailsBaseURI /path/to/my/app-symlink

9. Restart Apache/Passenger

service httpd restart

Assumption – The entire setup has been done on the CentOS servers.

Usage of Keyword as model/association in Rails

A quick note –

Attribute is a reserved key work so use it with caution.

Do not have any model, associations named as attribute.

It typically gives an error like this-

undefined method `keys’ for #<ActiveRecord::Relation:….

So in case you come across such an error, before debugging further, just do a quick check if the name is a reserved word in Rails.